Parts and equipment to make no till farming easier and more profitable.

No Till Farming Tips
Below are the top no till farming tips, which can help you to save time and produce higher crop yields.
Tip #1: Use The Best Equipment
A lot of the “no till” equipment that is being manufactured today has serious design flaws that need to be corrected for optimal no till planting. In order to get good crops, you need to use equipment that can penetrate tough soil and create uniform “V” seed furrows, without plugging. Do not be afraid to switch out OEM parts for parts that perform better and last longer.
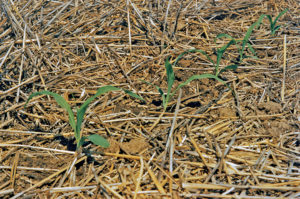
The devastating erosion and stand loss from strip till practices.
Tip #2: Keep The Ground Covered
In no till, it is essential that you protect the soil from wind and erosion, as well as heat. By maintaining 100% mulch cover, you will also be able to hold on to moisture from the rain better. If you don’t have residue in your fields, plant a cover crop. When harvesting, be sure to get crop residues spread the full width of the swath being harvested. This aids the seeding operation, helps create uniformity of temperature and moisture across the field, and uniformity of nutrient availability as those residues decompose.
Tip #3: Apply Herbicides Correctly
One of the keys to successful no till farming is the correct application of herbicides to fend off weeds, shrubs, and grass. Whether you do the spraying yourself or hire someone, it’s important to use the right equipment, under optimal conditions, at appropriate settings in order to maintain weed control throughout the planting season.
This perfect stand in no till farming resulted from seeding with Keetons and Thompson wheels. There was no rain after planting until the 3 leaf stage!
Tip #4: Make Good Seed Furrows, and Place Seeds Carefully
For the highest crop yields, it’s all about great seed furrows. To create the best seed furrow, you need: optimal depth, consistent depth, and seeds embedded at the bottom of the furrow, and the sidewalls shattered but not excessively packed above the seeds.
Tip #5: Check Your Seed Placement
Before you plant an entire field, plant a test pass, and then stop and check your seed placement. If you’re not doing an excellent job, make the necessary adjustments to your equipment. This extra time spent at the beginning of your day will ensure better success throughout the growing season. Great seed placement leads to great crop yields!
Tip #6: Learn Everything You Can
Talk to other successful no till farmers, take a class on no till seeding, read articles on how to improve no till techniques, such as planting in wet conditions and/or reach out to us with your no till questions and concerns.
Check out our catalog of no till equipment parts – you can view, download a PDF, or we’ll be happy to mail you a catalog.
For information on the 100+ parts, equipment, add-ons, and attachments that we sell for no till planting, call (800) 417-8020, or e-mail info@notillagriculture.com.
Please note: Located in McPherson, Kansas, we can ship no till parts, products, add-ons, and equipment throughout the U.S., Canada, and the world.
Click here to learn about no till planting in mud or how to help your no till seeds absorb moisture and how to help your no till plant roots flourish